Shapes
generativepy provides a variety of shape classes, that provide a consistent way to fill and stroke different shapes.
Every shape class is a subclass of Shape. All shapes are defined in the geometry module.
All shapes follows the same pattern:
- A constructor creates the class, accepting a context object that represents the image it will draw on.
- An
of_XXXmethod that sets the basic shape parameters. This varies depending on the shape. - Possibly some optional modifiers that enable variants of the basic shape.
fillandstrokemethods to fill or outline the shape (or both).
These methods are designed to be used in the fluent programming paradigm, where several methods are chained together on a single line. However, that is entirely optional, so you are not obliged to use that style if you don't wish to.
We will start by covering all the basic simple shapes, before moving on to a few special cases - polygons, circles, ellipses, and regular polygons.
Simple shapes
generativepy provides Rectangle, Square, Triangle, and Line shapes. These can also be implemented using the general Polygon shape, but the specialised shapes are often clearer and easier to use. Here are examples of the shapes:
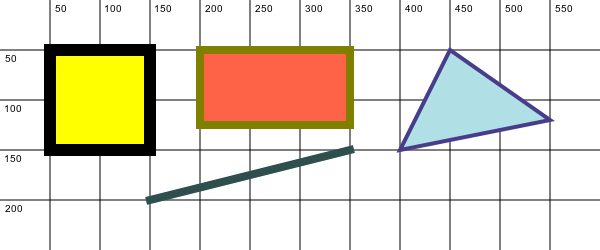
These shapes have been drawn on a background that shows a pixel grid, for illustration. This grid is drawn by some additional generativepy code, shown below. It won't normally appear on a generativepy image, of course.
Here is the code to draw the image above:
from generativepy.color import Color
from generativepy.drawing import make_image, setup
from generativepy.geometry import Rectangle, Square, Triangle, Line

def draw(ctx, pixel_width, pixel_height, frame_no, frame_count):
    setup(ctx, pixel_width, pixel_height, background=Color(1))

    Square(ctx).of_corner_size((50, 50), 100).fill(Color("yellow")).stroke(Color("black"), 12)
    Rectangle(ctx).of_corner_size((200, 50), 150, 75).fill(Color("tomato")).stroke(Color("olive"), 8)
    Triangle(ctx).of_corners((400, 150), (550, 120), (450, 50)).fill(Color("powderblue")).stroke(Color("darkslateblue"), 4)
    Line(ctx).of_start_end((150, 200), (350, 150)).stroke(Color("darkslategrey"), 8)


make_image("simple-shapes.png", draw, 600, 200)
The Square object uses of_corner_size to set its position and size. This takes 2 parameters. The first is a tuple that gives the position of its top left corner. This is set to (50, 50), and as you can see from the grid in the image, the corner of the square is indeed at (50, 50). Remember, of course, that the boundary of a shape is centred on the shape's true outline - that is, half of the boundary is inside the shape, half is outside.
The Rectangle object also uses the of_corner_size method, but this time it has 3 parameters. The first tuple, again, is the position of the corner, this time at (200, 50). The next 2 parameters are the width and height of the rectangle, which in this case are 150 and 75.
The Triangle shape works in a different way. It has an of_corners method that accepts 3 tuples that represent the corners of the triangle. This gives a lot of flexibility in defining the triangle.
We have already seen the Line class in the earlier section on line ends, it is just included here for completeness.
Polygons
The Polygon class can be used to create any type of general polygon. Here are some examples:
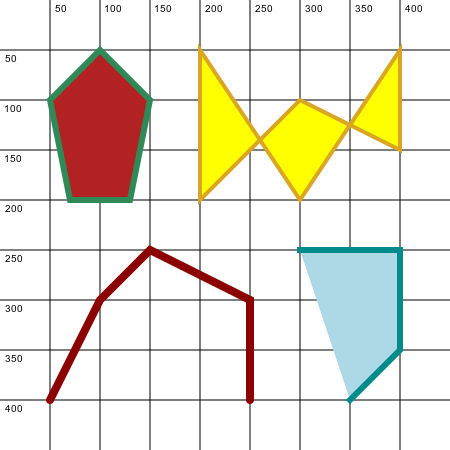
The Polygon class has a method of_points that accepts a list if tuples, one for each vertex of the polygon. The polygon is drawn by connecting the vertices with straight lines.
It also has an optional open method. If that method is called, the polygon is left open. This means that the final point is not connected back the first point (like the two polygons at the bottom of the image above).
Here is the code for the image:
from generativepy.color import Color
from generativepy.drawing import make_image, setup, ROUND
from generativepy.geometry import Polygon

def draw(ctx, pixel_width, pixel_height, frame_no, frame_count):
    setup(ctx, pixel_width, pixel_height, background=Color(1))

    (
        Polygon(ctx)
        .of_points(((100, 50), (150, 100), (130, 200), (70, 200), (50, 100)))
        .fill(Color("firebrick"))
        .stroke(Color("seagreen"), 6)
    )
    (
        Polygon(ctx)
        .of_points(
            ((200, 50), (300, 200), (400, 50), (400, 150), (300, 100), (200, 200))
        )
        .fill(Color("yellow"))
        .stroke(Color("goldenrod"), 4)
    )
    (
        Polygon(ctx)
        .of_points(((50, 400), (100, 300), (150, 250), (250, 300), (250, 400)))
        .open()
        .stroke(Color("darkred"), 8, cap=ROUND)
    )
    (
        Polygon(ctx)
        .of_points(((300, 250), (400, 250), (400, 350), (350, 400)))
        .open(True)
        .fill(Color("lightblue"))
        .stroke(Color("darkcyan"), 6)
    )


make_image("polygons.png", draw, 450, 450)
The red pentagon in the top left is drawn using 5 points. It is then filled in red and stroked in green. The yellow shape in the top right shows hwo we can draw an intersecting polygon. The vertices of the polygon are always drawn in the order that they appear in the list.
The shape in the bottom left shows an open polygon because it calls the open method. The last point at (350, 400) is not joined to the first point at (300, 250). Notice that the 2 open ends of the shape are rounded, as specified by the ROUND line cap specifier in the stroke method.
The shape in the bottom right is another open polygon. This time we have also filled the polygon. The fill happens as if the polygon were a close polygon, but the stroke still leaves the final line undrawn. This is a slightly unusual effect that you might not need to use very often.
Notice that, in the final shape, we call open with a parameter True. This parameter is optional. If we call open and pass in False, then the polygon will be closed (as if open had never been called). This can be useful if you ever need to make a polygon optionally open of closed based on a condition.
Circles
We looked at the Circle class earlier, but in this section we will look at extra modifiers that can be used to create sectors, segments, and arcs. Here is an image illustrating these features:

Here is the code:
import math

from generativepy.color import Color
from generativepy.drawing import make_image, setup
from generativepy.geometry import Circle, Text


def draw(ctx, pixel_width, pixel_height, frame_no, frame_count):
    setup(ctx, pixel_width, pixel_height, background=Color(1))

    (
        Circle(ctx)
        .of_center_radius((150, 150), 75)
        .fill(Color("yellow"))
        .stroke(Color("black"), 6)
    )
    Text(ctx).of("A", (75, 75)).size(30).fill(Color("black"))
    (
        Circle(ctx)
        .of_center_radius((300, 150), 75)
        .as_sector(math.radians(0), math.radians(135))
        .fill(Color("yellow"))
        .stroke(Color("black"), 6)
    )
    Text(ctx).of("B", (325, 125)).size(30).fill(Color("black"))
    (
        Circle(ctx)
        .of_center_radius((150, 350), 75)
        .as_segment(math.radians(-90), math.radians(20))
        .fill(Color("yellow"))
        .stroke(Color("black"), 6)
    )
    Text(ctx).of("C", (125, 325)).size(30).fill(Color("black"))
    (
        Circle(ctx)
        .of_center_radius((300, 350), 75)
        .as_arc(math.radians(-90), math.radians(20))
        .stroke(Color("black"), 6)
    )
    Text(ctx).of("D", (300, 325)).size(30).fill(Color("black"))


make_image("circles.png", draw, 450, 450)
The first circle, labelled A, is just a normal circle. The of_center_radius method specifies a centre of (150, 150) and a radius of 75.
B shows a sector - that is, a pie slice. This is created by adding an extra call to the as_sector method. This method takes two angles that control which part of the circle is included in the sector, as explained below.
C shows a segment. A segment is created when a chord of the circle divides the circle into 2 parts. This is created by calling the as_segment method, again with 2 angles.
D shows an arc. An arc is part of the circumference of the circle. This is created by calling the as_arc method, again passing in 2 angles. Notice that we haven't called fill in this case, because an arc is a line rather than a shape. You can fill an arc - it will fill the same area as the segment, but it will not draw a line between the 2 ends of the arc. This is not normally what you would want to do, it is usually better to draw a segment rather than a filled arc.
Arc angles
The as_sector, as_segment, and as_arc methods each take a start and stop angle. The angles are defined clockwise from the positive x-axis like this:
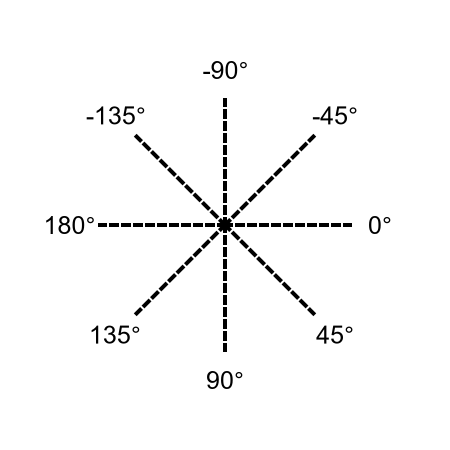
The horizontal line from the centre towards the right is defined to be 0. If we move in a clockwise direction, the angle is positive and increasing. If we move counterclockwise, the angle is negative and decreasing.
A sector is defined by its stat and end angle. The sector starts at the start angle and moves clockwise to the end angle. Here, the sector on the left starts at -45° and ends at 90°, in a clockwise direction:
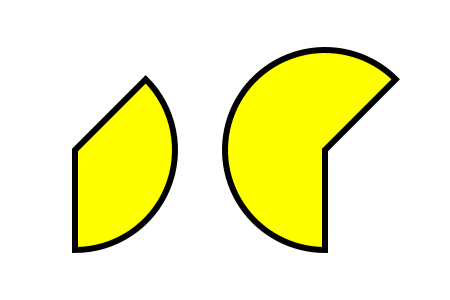
The sector on the right starts at 90° and ends at -45°, again in a clockwise direction. In that case, the sector covers an angle of more than 180°, making it a major sector.
Arcs and segments are specified in the same way.
There are a couple of things to note about this. First, we have described this using angles measured in degrees, but in fact generativepy uses radians to measure angles. If you wish to work in degrees, you can use the radians function from the Python standard math library to convert degrees to radians. This is shown in the example code above.
Also, when specifying angles, adding or subtracting any multiple of 360° will not affect the result. So, for example, the angle -45° can be expressed as 315° if you prefer. If you are working in radians, adding or subtracting any multiple of 2π will not affect the result.
Ellipses
An ellipse can be thought of as a kind of stretched circle.
See also
Join the GraphicMaths Newletter
Sign up using this form to receive an email when new content is added: